Click on the picture for more images
Showing posts with label microscopy. Show all posts
Thursday, 27 June 2013
Wednesday, 19 December 2012
Project in progress (part 3)
Lesson learned, don't flap around when fragile butterfly wing bits are on the microscope slide as they have a tendency to catch the breeze and float into oblivion.
This was taken from the upper surface of the butterfly wing, the blue colour isn't obvious as the light is shining through from underneath. What I found interesting were the little scale structures. Are these going to grow into larger scales, or are they subsidiary? Interspersed among the scales are hair like structures (are they hairs or modified scales?) (Addendum: I've just found out that scales are modified hairs).
I took some pictures at higher magnification, but will need to do some serious Googling to see if I can find anything about the details of types and forms of wing scales. Initial forays into the ether have not been very successful.
Scales were removed using the sellotape method and I then looked at the wing. It would seem that the scales are laid down on a membrane.
The following two images show the same section of wing taken with top lighting (top image) and transmitted light (bottom image).
It is clear that the scales on the upper surface of the wing are quite different is shape to those on the under surface.
Top lighting (top image) shows the blue colour of the upper wing surface. The transmitted light (lower bottom image) seems to show more detail of the scales.
This was taken from the upper surface of the butterfly wing, the blue colour isn't obvious as the light is shining through from underneath. What I found interesting were the little scale structures. Are these going to grow into larger scales, or are they subsidiary? Interspersed among the scales are hair like structures (are they hairs or modified scales?) (Addendum: I've just found out that scales are modified hairs).
I took some pictures at higher magnification, but will need to do some serious Googling to see if I can find anything about the details of types and forms of wing scales. Initial forays into the ether have not been very successful.
Scales were removed using the sellotape method and I then looked at the wing. It would seem that the scales are laid down on a membrane.
The following two images show the same section of wing taken with top lighting (top image) and transmitted light (bottom image).
It is clear that the scales on the upper surface of the wing are quite different is shape to those on the under surface.
Top lighting (top image) shows the blue colour of the upper wing surface. The transmitted light (lower bottom image) seems to show more detail of the scales.
Labels:
butterfly,
Common blue,
microscopy,
Polyommatus icarus,
wing scales
Monday, 19 November 2012
Project in progress
I set up the stereo microscope for those first views, and took pictures with a Dinoscope lens that replaces one of the eyepieces and is directly connected to the computer. Other pictures were taken with the set up as shown below.
The following pictures show the start of the project. Lighting is always a problem, getting sufficient light with no shadows. Then there is the problem of depth of field.
![]() |
| Common blue butterfly (Polyommatus icarus) -eye |
![]() |
| Common blue butterfly (Polyommatus icarus) eye |
![]() |
| Common blue butterfly (Polyommatus icarus) wing |
![]() |
| Common blue butterfly (Polyommatus icarus) wing showing scales |
![]() |
| Common blue butterfly (Polyommatus icarus) wing scales |
![]() |
| Common blue butterfly (Polyommatus icarus) wing scales |
![]() |
| Common blue butterfly (Polyommatus icarus) edge of wing |
![]() |
| Common blue butterfly (Polyommatus icarus) edge of wing |
A start has been made, I now want to improve the clarity of the images so will use the compound microscope.
Labels:
butterfly,
Common blue,
microscopy,
Polyommatus icarus,
wing scales
Sunday, 28 October 2012
Insect eaters
Over the last few days I have uploaded pictures onto my photoblog of one of the insectivorous plants I have (Drosera paradoxa). The idea was that as the series progressed I moved closer to the plant. Over the weekend I got out the microscopes and developed the theme a bit further.
Utricularia (Bladderwort) was my starting point. I've never kept this species before, though I have seen it growing in the wild in the waterways in Holland. I bought a plant a couple of weeks ago and its delicate structure belies its sophistication as an animal trapper.
Pinguilica (Butterwort), a favourite because of its almost all year round flowering. Many insectivorous plants are very canny in that they grow their flowers on long stalks to ensure they get pollinated by those insects that haven't ventured low enough to be trapped and caught.
Butterwort leaves are sticky and glandular and under the microscope the stalked glands can be seen.
Sarracenia (Pitcher plant) was next for examination. The downward pointing hairs and sticky secretions became obvious as the "lid" to the pitcher was put under the microscope.
Finally I couldn't resist the Drosera (Sundew), always eminently photogenic.
Utricularia (Bladderwort) was my starting point. I've never kept this species before, though I have seen it growing in the wild in the waterways in Holland. I bought a plant a couple of weeks ago and its delicate structure belies its sophistication as an animal trapper.
![]() |
| Utricularia (Bladderwort) |
I put a couple of stems under the microscope and attempted to find some of its subterranean bladder traps, but did not meet with much success, not least because I was not quite sure what I was looking for. A future project methinks.
Pinguilica (Butterwort), a favourite because of its almost all year round flowering. Many insectivorous plants are very canny in that they grow their flowers on long stalks to ensure they get pollinated by those insects that haven't ventured low enough to be trapped and caught.
Butterwort leaves are sticky and glandular and under the microscope the stalked glands can be seen.
![]() |
| Pinguliica (Butterwort) leaf glands Pinguliica (Butterwort) leaf glands - from a prepared microscope slide |
Sarracenia (Pitcher plant) was next for examination. The downward pointing hairs and sticky secretions became obvious as the "lid" to the pitcher was put under the microscope.
![]() |
| Sarracenia (Pitcher plant) |
I looked at the inside of the pitcher too, expecting more downward pointing hairs, but didn't see any. Again, another project for further investigation. Maybe they are smaller ones than those on the lid, perhaps they are not so common in plants in autumn because there are no insects. More investigation and Googling research are required.
Finally I couldn't resist the Drosera (Sundew), always eminently photogenic.
![]() |
| Drosera (Sundew) |
![]() |
| Flowering stems coiling and curling high above the leaves |
Thursday, 12 July 2012
Rainy day activities #3
A bit of microscopy and photo manipulation via Picasa which I have found I can use to edit RAW files which saves me upgrading my trusty Photoshop7.
The original image was from a prepared slide of a cross section of a cucumber stem.
Wednesday, 16 May 2012
Hidden beauties #15
Card 15 - Male shield fern
Ferns are one of my favourite plants.
Fern flora on a garden wall
Fascination of ferns
Tuesday, 15 May 2012
Monday, 14 May 2012
Hidden beauties #13
Card 13 - Catching by hairs
I seem to be meeting my self set blogging challenge to post every day (apart from weekends - a "rule" I set up en route). The cigarette cards have certainly provided food for thought, not least a realisation that there are projects I have had in my mind for a long time and have done nothing about. Seeing this picture of grass reminds me that I want to set up a series of pictures of flowers we don't notice - grass flowers, tree flowers, things like plantain. Then there is Spirogyra and other pond life that are so easy to obtain and look at.
Tomorrow I am expecting the arrival of a new microscope, so no excuses ..... At the moment things are quite fraught with student support note taking, but that is only to last another week or so and then I can begin!
I seem to be meeting my self set blogging challenge to post every day (apart from weekends - a "rule" I set up en route). The cigarette cards have certainly provided food for thought, not least a realisation that there are projects I have had in my mind for a long time and have done nothing about. Seeing this picture of grass reminds me that I want to set up a series of pictures of flowers we don't notice - grass flowers, tree flowers, things like plantain. Then there is Spirogyra and other pond life that are so easy to obtain and look at.
Tomorrow I am expecting the arrival of a new microscope, so no excuses ..... At the moment things are quite fraught with student support note taking, but that is only to last another week or so and then I can begin!
Labels:
grass,
hidden beauties,
microscopy,
new microscope,
projects,
seed
Friday, 11 May 2012
Thursday, 10 May 2012
Hidden beauties #11
Card 11 - A leaf slice
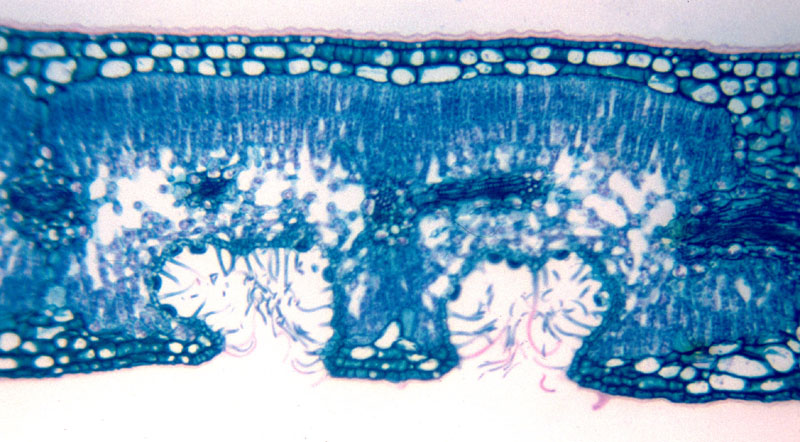
As can be seen from the following images, leaf structure can be quite varied, but the overall "plan" is quite similar. The upper epidermis protects the leaf and then underneath that is usually the palisade layer; this is the layer where most of the photosynthesis takes place, its cells are usually tall and cylindrical and well supplied with chloroplasts.. Beneath this layer are the more loosely packed and irregularly shaped cells of the spongy mesophyll layer; beneath that is the lower epidermis. Most of the stomata are usually found in this layer. Carbon dioxide enters the leaf through the stomata and diffuses through to the palisade cells to be combined with water (brought in from the root via the xylem tissue) to form carbohydrates using light energy from the sun.
More information can be found in this article I wrote for Microscopy UK
As can be seen from the following images, leaf structure can be quite varied, but the overall "plan" is quite similar. The upper epidermis protects the leaf and then underneath that is usually the palisade layer; this is the layer where most of the photosynthesis takes place, its cells are usually tall and cylindrical and well supplied with chloroplasts.. Beneath this layer are the more loosely packed and irregularly shaped cells of the spongy mesophyll layer; beneath that is the lower epidermis. Most of the stomata are usually found in this layer. Carbon dioxide enters the leaf through the stomata and diffuses through to the palisade cells to be combined with water (brought in from the root via the xylem tissue) to form carbohydrates using light energy from the sun.
![]() |
| Pampas grass - transverse section through leaf |
![]() |
| Pinguilica (Butterwort) TS through leaf showing mucilage secreting hair which helps trap insects |
![]() |
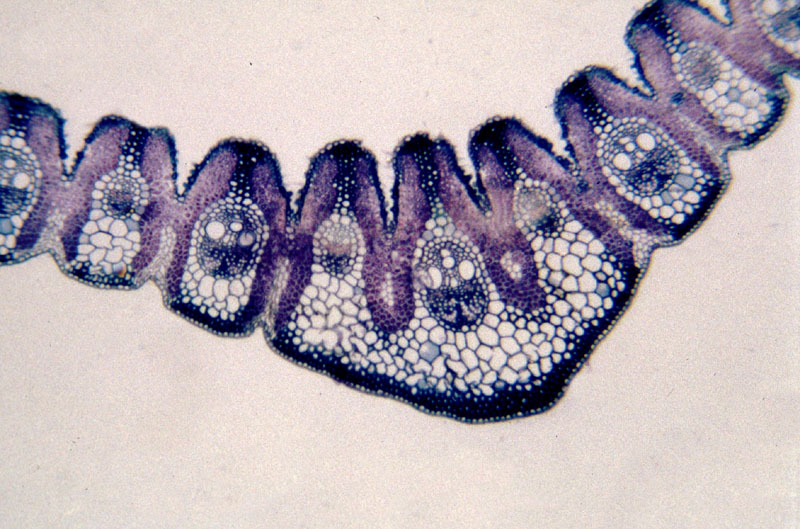
| Marram grass TS through leaf. Marram grass needs to conserve water so the leaf is curled, stomata are situated in pits,. |
More information can be found in this article I wrote for Microscopy UK
Labels:
hidden beauties,
leaves,
maize,
marram,
microscopy,
pampas,
xerophyte
Wednesday, 9 May 2012
Hidden beauties #10
Card 10 - An airing apparatus
Hmmm, rather a broad sweeping statement to say that pondweed has no external beauty!
![]() |
| Potamogeton transverse section through stem |
The image above is another one I took from a prepared microscope slide, again, the colouration is due to stains used to make tissues more obvious. The air spaces which keep the plant buoyant are clearly visible. Buoyancy is necessary to keep the leaves near the surface so that photosynthesis can be maximised. The dark structure in the middle is the vascular tissue, this central arrangement gives the stem more flexibility in moving water. In non woody land plants the vascular tissue is often arranged near the edge of the stem to form a strengthening cylinder; in contrast, root vascular tissue is arranged centrally, thus providing more strength against pulling forces.
Tuesday, 8 May 2012
Hidden beauties #9
Card 9 - Pith stars
This image of stellate parenchyma is from one of many prepared slides given to me. The slides had been made as part of a university course and provided a basis for my first explorations into microscopy. The slides themselves seemed ancient, having been made before I was born.
The photograph is one of my first forays into photomicrography. As a biology teacher I had realised that pupils very often were not sure what they were looking for on a slide - for example, air bubbles were often mistaken for cells. So, I decided that if I could provide photographs which helped them identify what they were looking for, the learning experience might be more fulfilling.
The set up with my original microscope was quite challenging, the lens from the SLR was removed and then using a special attachment, the camera was set on the eyepiece. Focusing was quite difficult, both because the light entering the camera wasn't too bright (it was reflected from an old table light via a mirror) and also because the weight of the camera made the whole set up rather unsteady.
Monday, 7 May 2012
Hidden beauties #5, #6, #7 and 8
Circulation within cells, and plant hairs
Card 5 - A pink and hairy skin
Card 6 - Circulation currents in hairs
Plant hair variety.
Card 5 - A pink and hairy skin
Card 6 - Circulation currents in hairs
Card 7 - Rotation
Card 8 - A miniature forest
The cytoplasmic streaming is called cyclosis, I've found this video which demonstrates it:
Plant hair variety.
![]() |
| Viewing under polarised light can make the hairs more obvious |
| Nettle sting |
![]() |
| Hairs on a seed, I haven't been able to remember the name of the seeds, but I do know they came with warnings! |
Friday, 4 May 2012
Hidden beauties #4
Card 4 -The "mouths" of leaves
The stomata are the pores through which gas exchange takes place.The two guard cells surrounding each stoma contain cholorophyll (unlike the other cells in the epidermis); it is the guard cells that control the size of the stomata.
A "cast" can be taken from the surface of leaves using nail varnish. When the nail varnish is peeled off it can be put under the microscope.
More images can be see in an article I wrote for 1997 in Microscopy UK (http://www.microscopy-uk.org.uk/mag/indexmag.html?http://www.microscopy-uk.org.uk/mag/art97b/epider.html) (This article now looks very dated, html and web page design having moved on incredibly in the intervening time!)
The following images are of prepared epidermal tissue on a microscope slide, the blue colour is due to the dye used to make structures stand out more clearly.
The stomata are the pores through which gas exchange takes place.The two guard cells surrounding each stoma contain cholorophyll (unlike the other cells in the epidermis); it is the guard cells that control the size of the stomata.
A "cast" can be taken from the surface of leaves using nail varnish. When the nail varnish is peeled off it can be put under the microscope.
![]() |
| Nail varnish cast of leaf epidermis from a dicotyledon (top) and monocotyledon (bottom) |
The following images are of prepared epidermal tissue on a microscope slide, the blue colour is due to the dye used to make structures stand out more clearly.
![]() |
| Prepared slide: leaf epidermis, dicotyledon (top), monocotyledon (bottom) |
Commelina leaves are ideal for observing stomata as their epidermis peels very easily. The following image is one I took from a leaf of a plant I grew from seed. The chloroplasts are clearly visible in the guard cells.
Labels:
Commelina,
dicotyledon,
hidden beauties,
leaf,
leaf epidermis,
microscopy,
monocotyledon,
stomata
Subscribe to:
Posts (Atom)